- Published on
Introduction to PowerShell Scripting
16 min read- Authors

- Name
- Daniel Mackay
- @daniel_mackay

What is PowerShell? ⚡
PowerShell is a cross-platform scripting language that comes installed by default in Windows. It is built on top of .NET, so if you are already experienced with that, you'll find many of the common structures and functions familiar. PowerShell consists of a command-line shell and a scripting language. You can either leverage the built-in modules or create your scripts to automate tasks (usually, we would do a combination of both).
PowerShell provides a built-in help system and allows to you pipe output from one command to the next which allows for a powerful scripting experience.
PowerShell differs from traditional command-line shells as it operates on objects instead of text. You can inspect outputs to see the available properties and functions. The structured output helps hugely when needing to filter/sort/project certain properties.
Why should I use PowerShell?
It allows you to automate common or repetitive tasks. The advantage of this is that once a script has been created and verified it will run consistently which reduces the chance of error. Running a single script instead of having to enter many commands manually will also result in an increase in productivity for commonly run tasks. For long-running scripts, you can kick them off and then go grab a coffee. ☕
PowerShell can help you to automate tasks such as:
- CI / CD pipelines
- Managing cloud Resources
- Automate development tasks or workflows
- User management
- Call REST APIs and process JSON responses
Setup
Which Version Should I Use?
The original version was called Windows PowerShell. If you are running version 5 or below, this is what you have. The newer version is called PowerShell Core or simply PowerShell. If you are running version 7.0+, this is what you have.
You can find your current version by running $PSVersionTable which will display something like:
Name                           Value
----                           -----
PSVersion                      7.2.6
PSEdition                      Core
GitCommitId                    7.2.6
OS                             Microsoft Windows 10.0.22621
Platform                       Win32NT
PSCompatibleVersions           {1.0, 2.0, 3.0, 4.0…}
PSRemotingProtocolVersion      2.3
SerializationVersion           1.1.0.1
WSManStackVersion              3.0
I recommend running PowerShell Core (v7.0+) which is the latest cross-platform version.
Installation
If you are running on Windows 8 or later you will already have PowerShell installed.
The easiest way to install this on Windows is via winget:
winget install --id Microsoft.Powershell --source winget
The easiest way to install this on MacOs is via homebrew:
brew install --cask powershell
VS Code
VS Code is the best way to create PowerShell scripts. There are a couple of things that you need to set up to provide the best experience
Extension
Install the PowerShell extension:
Workspace Setup
Configure the following editor settings in .vscode\settings.json:
{
  "editor.renderWhitespace": "all",
  "editor.renderControlCharacters": true,
  "files.trimTrailingWhitespace": true,
  "files.encoding": "utf8bom",
  "files.autoGuessEncoding": true
}
Configure launch settings so that you can debug, set breakpoints, and step through scripts. These should be added to .vscode\launch.json:
{
  // Use IntelliSense to learn about possible attributes.
  // Hover to view descriptions of existing attributes.
  // For more information, visit: https://go.microsoft.com/fwlink/?linkid=830387
  "version": "0.2.0",
  "configurations": [
    {
      "type": "PowerShell",
      "request": "launch",
      "name": "PowerShell Launch (current file)",
      "script": "${file}",
      "args": [],
      "cwd": "${file}"
    },
    {
      "type": "PowerShell",
      "request": "attach",
      "name": "PowerShell Attach to Host Process",
      "processId": "${command.PickPSHostProcess}",
      "runspaceId": 1
    },
    {
      "type": "PowerShell",
      "request": "launch",
      "name": "PowerShell Interactive Session",
      "cwd": "${workspaceRoot}"
    }
  ]
}
Creating Scripts
The easiest way to run PowerShell is via the CLI. While this is fine for one-off commands, the more common approach is to create a reusable script that can be repeatedly run as needed. PowerShell scripts must end in .ps1.
The easiest way to create a script is:
New-Item MyScript.ps1
This script can then be executed via:
.\MyScript.ps1
Variables
Variables must start with $ and can be declared in a variety of ways:
$age = 10                                   # integer variable
$name = "john"                              # string variable
[string]$name = "john"                      # string variable with explicit type
[DateTime]$date = "January 5, 2022 10:00AM" # datetime variable
$name = $null                               # clears a variable
Most of the time there is no need to specify the type explicitly. PowerShell will figure it out for us. However, if needed we can do that via the use of []. If you are unsure of the type of a variable we can inspect this via $name.GetType().
Variables also have a concept of scope which you can learn more about here.
Arrays
Like most languages, Powershell has a concept of arrays to store lists of data. These can be declared as follows:
$heros = "batman", "superman", "robin"      # array of strings
$heros = @("batman", "superman", "robin")   # array of strings
$heros = @()                                # empty array
$strength = 90, 100, 80                     # array of integers
Data can then be manipulated as follows:
$heros[0]               # returns first hero
$heros.Get(0)           # returns first hero
$heros += "spiderman"   # adds spiderman to the heroes
$heros.Count            # returns the total number of heroes
Array Lists
Arrays are easy to use, but hard to manipulate. As they are created with a fixed size and manipulation will create a new array. This may not matter for small arrays but could have performance implications for large arrays.
Array Lists are more flexible, and provide extra methods that are handy for manipulation:
[System.Collections.ArrayList]$heros = "batman", "superman", "robin"    # creates a new array list
$heros = New-Object System.Collections.ArrayList                        # creates an empty array list
$heros.Add("spiderman")                                                 # adds spiderman to the heros
$heros.Remove("robin")                                                  # removes robin from the heros
$heros.RemoveAt(1)                                                      # removes hero at array position 1
Hash Tables
Hash Tables are similar to array lists, but instead of storing data by a numeric index, we can store the data by any arbitrary key. This is helpful when we need to look items up by ID, and is similar to how Dictionaries work in .NET.
$heros = @{"batman" = 90, "superman" = 100, "robin" = 80}   # create a hash table of heroes
$heros.'batman'                                             # returns the batman hero
$heros['batman']                                            # returns the batman hero
$heros.Add("spiderman", 90)                                 # adds spiderman hero
$heros.Remove("robin")                                      # removes robin hero
$heros.'robin' = 85                                         # sets robins strength to 85
Input / Output
Most scripts will have some sort of input or output.
To collect input from the user we can write:
$multiverse = Read-Host "Which multiverse is the hero from?"
We can make Read-Host more secure by using extra flags. -MaskInput will mask the input with asterisks so the input cannot be seen. -AsSecureString will do something similar, but also store the result in a SecureString object. This option should be used for secrets and passwords.
To write output back to the user we can write:
Write-Host "Multiverse has been set to $multiverse"
This can be useful for debugging which we'll talk more about soon.
Parameters
The best way to make your scripts reusable is to allow users to provide inputs via parameters. This allows the script behavior to be dynamic without having to manually change the script which introduces the possibility of errors (which is one of the main things we are aiming to avoid by using PowerShell).
This can be done as simply as:
Param($heroName)
Placing this at the top of your script will expose the $heroName variable for use as provided by the user.
However, we can make this even better by providing extra parameter metadata:
Param
(
    [Parameter(Mandatory, HelpMessage = "Please provide a hero name")]
    [ValidateNotNullOrEmpty()]
    [string]$heroName

    [Parameter(HelpMessage = "Please provide the heros strength")]
    [ValidateSet(80, 90, 100)]
    [int]$strength = 80
)
The above is doing a lot of things:
$heroNameis mandatory$strengthis optional, but if not specified we will default to80- We've set up custom help messages
$heroNamewill not accept empty or null strings$strengthwill only accept the values80,90, or100(a bit contrived I know, but it shows the concept 😄)
There is so much more we can do with parameters, like configuring the enabling values to be piped in, adding further validation attributes, and using the switch data type to act as a toggle (which is preferable over using booleans).
You may be wondering: when should I be using parameters over read-host? The answer to that would be, when do you need to collect input from the user? If you need to collect input at the start of the script, then parameters are the right choice. If you need to collect user input during your script execution (e.g. after some commands have already been run), then read-host would be a better choice.
Flow Control
Any substantial script will usually use flow control to decide if certain commands should be executed or not. PowerShell provides similar constructs found in most programming languages such as if/else and switch statements.
One point of difference with PowerShell is that conditions and equality are written slightly different in other languages:
$True/$Falseare built in primitives- Equality operators
-eq: equal to-not: not equal to-le: less than or equal to-ge: greater than or equal to-gt: greater than-lt: less than
An example of an if/else statement looks like this:
If ($multiverse -eq 'DC') {
    Write-Host 'DC Multiverse'
} ElseIf ($multiverse -eq 'Marvel') {
    Write-Host 'Marvel Multiverse'
} Else {
    Write-Host 'Multiverse is not valid'
}
Of course, this could also be written as a switch statement:
Switch ($multiverse) {
    'DC' { Write-Host 'DC Multiverse' }
    'Marvel' { Write-Host 'Marvel Multiverse' }
    Default { Write-Host 'Multiverse is not valid' }
}
Loops
It is no surprise that PowerShell has the same loop constructs as most other programming languages.
For loops:
For ($i = 0; $i -le 10; $i++) {
    Write-Host "Value of i is $i"
}
Foreach loops:
$heros = "superman", "batman", "robin"
ForEach($hero in $heros) {
    Write-Host "Hero's name: $hero"
}
Foreach will work on arrays, array lists, and any other collection that implements IEnumerable under the hood.
A newer feature of PowerShell also allows lists to be processed in parallel. This could be useful for large lists of data:
$heros = "superman", "batman", "robin"
$heros | ForEach-Object -Parallel { Write-Host "Hero's name: $hero" }
Other loop constructs like While, Do-While, and Do-Until are also supported.
Functions
If you have a block code that you would like to reuse within a script you can create a function.
A function looks like this:
Function Get-GreetHero([string]$heroName){
    Write-Host "Welcome to earth $heroName!"
}
There are two ways that we could call this function:
Greet-Hero("Superman")
Greet-Hero "Superman"
If we wanted to return the result directly we can:
Function Get-GreetHero([string]$heroName){
    return ("Welcome to earth $heroName!")
}
Error Handling
Errors can be divided into two categories: terminating and non-terminating errors. The difference is that a terminating error will stop the script from executing any further by throwing an exception. Whereas a non-terminating error will generally report the error and continue.
Debugging
There are a couple of options when it comes to debugging a PowerShell script. The first is to simply litter your code with Write-Host statements. To make these stand out we can also use Write-Warning which will highlight the output to the CLI.
If you get a bit more organized, you can leverage Write-Debug and Write-Verbose so that the output is excluded by default, but can be turned on via the use of -Debug or -Verbose. These can only be used by advanced cmdlets.
If you have set up the VS Code extension above you can also set breakpoints in the editor, and step through your code viewing variables as the script executes.
If you have not setup VS Code, you can set breakpoints via the CLI as follows:
Set-PSBreakPoint -Script "MyScript.ps1" -Line 23
Set-PSBreakPoint -Command "Set-ADUser" -Script "MyScript.ps1"
Set-PSBreakPoint -Variable "computer" -Script "MyScript.ps1" -Mode ReadWrite
Custom Objects
Custom objects are a great way to create types with defined properties.
We can do this via:
$hero = [PSCustomObject]@{
    Name        = 'Superman'
    Strength    = 100
    Multiverse    = 'DC'
}

Write-Host $hero
Write-Host $hero.Name "is from" $hero.Multiverse
The above script will output:
@{Name=Superman; Strength=100; Multiverse=DC}
Superman is from DC
It is also possible to further augment an object after creation and add extra properties via Add-Member.
Filtering
Filtering allows you to restrict the number of rows returned based on a certain condition.
The following selects all processes where the total CPU execution time is greater than 50 seconds:
Get-Process | Where-Object CPU -gt 50
Get-Process | Where CPU -gt 50
Both Where-Object and Where work in the same way.
Projecting
Projecting is where we restrict the number of columns returned.
For example, we can project only the ProcessName and Process ID from all processes currently running:
Get-Process | select-object ProcessName, ID
Select-Object can also be used to filter a certain number of rows. This is similar to how Skip() and Take() work in LINQ.
Get-Process | select-object -First 5          # returns the first 5 processes
Get-Process | select-object -Last 5           # returns the last 5 processes
Get-Process | select-object -Skip 10 -First 5 # skips 10 processes and returns the next 5
Sorting
Sorting can be used to order data by a certain property.
For example, we may wish to see which processes are using the most CPU:
Get-Process | Sort-Object -Descending -Property CPU
We can also sort by multiple properties:
Get-Process | Sort-Object -Property @{Expression = "CPU"; Descending = $True}, @{Expression = "Name"; Descending = $False}
Piping
You'll notice that several of the examples above use the | character. This tells PowerShell to pipe the data from one command to another. This allows us to chain commands together to create powerful scripts.
Formatting
When querying data or system information PowerShell outputs the data in a default manner. However, we can change this to a view that is more appropriate for our data.
Returning data in a table format:
Get-Process | Select-Object -First 3
Get-Process | Select-Object -First 3 | Format-Table
Both these commands will return:
 NPM(K)    PM(M)      WS(M)     CPU(s)      Id  SI ProcessName
 ------    -----      -----     ------      --  -- -----------
      7     1.55       7.14       0.00    8000   0 AggregatorHost
     39    41.05      49.68       1.77   21756   2 ApplicationFrameHost
     27    22.93     103.53     344.14    4928   0 audiodg
Returning data in a list:
Get-Process | Select-Object -First 3 | Format-List
This command will return:
Id      : 8000
Handles : 113
CPU     :
SI      : 0
Name    : AggregatorHost

Id      : 21756
Handles : 678
CPU     : 1.765625
SI      : 2
Name    : ApplicationFrameHost

Id      : 4928
Handles : 384
CPU     : 344.140625
SI      : 0
Name    : audiodg
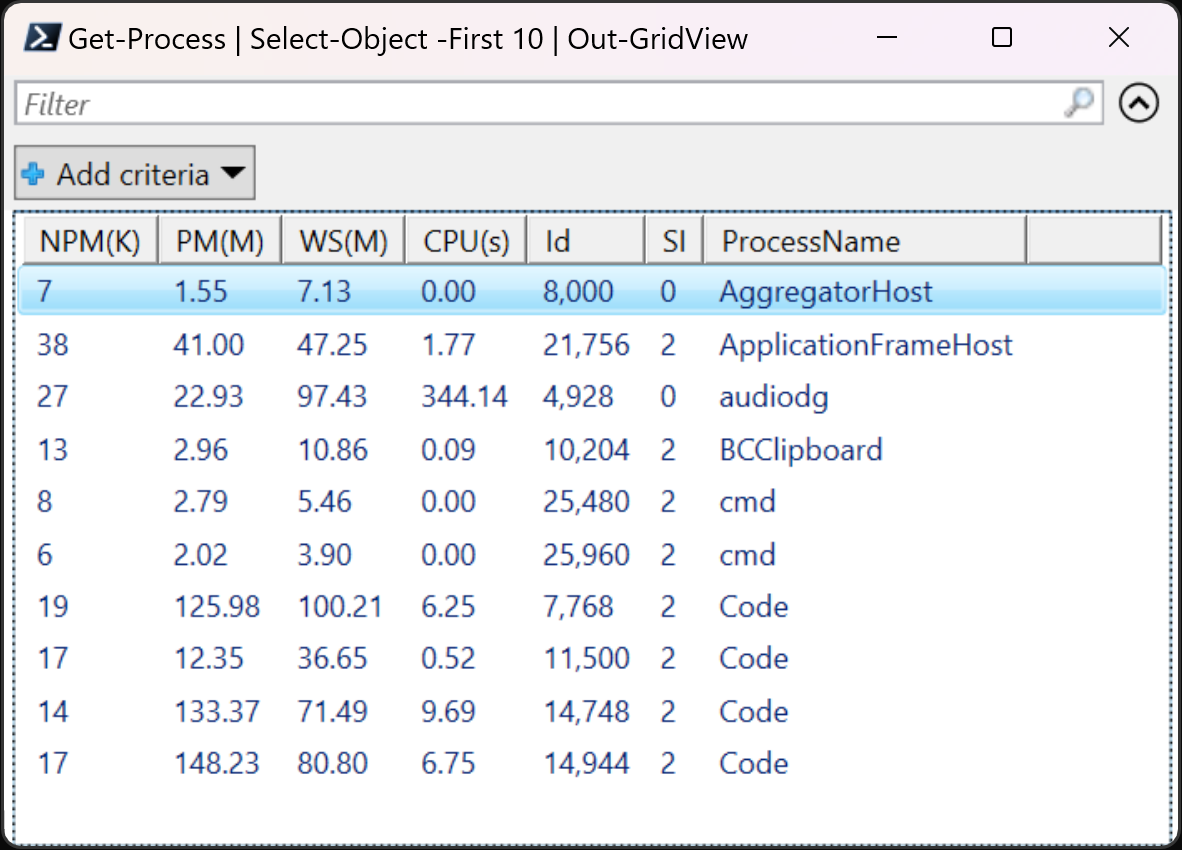
Returning data in a grid view:
Get-Process | Select-Object -First 10 | Out-GridView
The grid view is super cool as it displays a GUI, that allows us to apply further filtering and sorting. It can even be used to give the user a way of graphically selecting one or more rows for further processing. How awesome is that!? 😎
Help System
Once you've mastered the constructs above, the next way you can improve your PowerShell is to become aware of the built-in commands. Going through all these is outside the scope of this article, but we can at least take a look at how the help system works.
Get-Command allows us to search for commands by verb or noun:
Get-Command -Noun *process*   # returns all commands that contain the text 'process'
Get-Command -Verb New         # returns all commands that allow you to 'create' something new
Once you have found your command of interest, you can then use help to get more information
Get-Help New-Item           # Display help overview for New-Item
help New-Item               # Display help overview for New-Item
Get-Help New-Item -Detailed # Display detailed help for New-Item
We can also get help for an individual type with Get-Member:
get-member -InputObject System.Management.Automation.CommandInfo  # Get type info for the CommandInfo object
1 | get-member                                                    # Get type info for integers
"a string" | get-member                                           # Get type info for strings
Type information will include all public members, such as properties and methods.
Summary
PowerShell is a technology that I seem to be needing to use more and more these days. This is especially when it comes to DevOps and Cloud Infrastructure work. You always have to consider the right tool for the right job, and when it comes to automation or scripting, PowerShell does the job VERY well. If you already have experience with .NET you should find many of the constructs and objects already familiar.
In this article, I have explained what PowerShell is, how it can be installed, and how to set up your development environment. I have shown how to create simple scripts, make these more dynamic through variables, parameters, and inputs/outputs, and store data in more interesting ways with arrays and hash tables. I have then shown how to make more complex scripts with flow control and loops. I have shown how to re-use code with functions and how to debug and provide error handling. I have also touched on some of the built-in cmdlets that allow you to filter, sort, and project data into different shapes. I have shown how to format output into lists, tables, and grids. Lastly, I have shown how to use the help system to explore and find other built-in cmdlets.
Give PowerShell a go next time you need to automate a one-off or repeatable task. Let me know how you go! 😄