- Published on
Deploying .NET Aspire to Azure with App Service, Azure SQL and Application Insights
10 min read- Authors

- Name
- Daniel Mackay
- @daniel_mackay

- Introduction
- Prerequisites
- Creating a .NET Aspire Application
- AppHost Modification
- Deployment Process
- Conclusion
- Sample Code
- Additional Resources
Introduction
.NET Aspire has transformed how we build cloud-native applications in the .NET ecosystem, providing an opinionated, cloud-ready stack for building observable, distributed applications. 🚀
While Aspire's default deployment story centers around Azure Container Apps, there are compelling scenarios where you might prefer Azure App Services - whether for cost predictability, existing infrastructure investments, or operational simplicity.
Why Choose App Services Over Container Apps?
In my experience with enterprise teams, App Services offer several advantages:
- Fixed-tier pricing that's more predictable for steady workloads
- Leverage existing App Service Plans and infrastructure investments
- Simplified management familiar to traditional operations teams
- Better integration with existing monitoring and deployment tooling
Why Choose Azure SQL Database Over Containerized Databases?
While Container Apps can run containerized databases, Azure SQL Database provides significant advantages for production workloads:
- Managed service benefits - automatic backups, patching, and high availability without operational overhead
- Enterprise-grade security with built-in threat detection, data encryption, and compliance certifications
- Performance and scaling options including serverless compute and hyperscale storage
- Operational excellence with monitoring, query performance insights, and automatic tuning
- Cost optimization through reserved capacity pricing and pause/resume capabilities
For most enterprise scenarios, the operational simplicity and robust feature set of Azure SQL Database outweigh the flexibility of running database containers. ⚠️
What We'll Accomplish
This guide walks you through deploying a .NET Aspire application to Azure App Services instead of Container Apps:
✅ Create a sample Aspire application with Entity Framework and multiple services
✅ Modify Azure infrastructure to provision App Services, Azure SQL Database and Application Insights
✅ Configure service-to-service communication in a App Services environment
✅ Deploy the complete solution to Azure
✅ Monitor the solution via Open Telemetry and Application Insights
By the end, you'll understand how to adapt Aspire's deployment model to fit your infrastructure requirements. Let's dive in! 🎯
Prerequisites
To follow along, ensure you have the following set up:
- Azure CLI (AZ) and Azure Developer CLI (AZD)
- Aspire CLI (optional)
- Rider / VS2022 / VS Code
- Active Azure subscription
Creating a .NET Aspire Application
At SSW I'm one of the maintainers of the SSW Clean Architecture Template. This template provides a solid foundation for Clean Architecture, DDD, and Clean Testing. It leverages .NET Aspire to get an enterprise grade API up and running with real data in seconds.
Creating the solution
Install the Clean Architecture template:
dotnet new install SSW.CleanArchitecture.Template
Create the directory and solution:
mkdir AspireWebApp
cd AspireWebApp
dotnet new ssw-ca
Examining the Aspire Setup
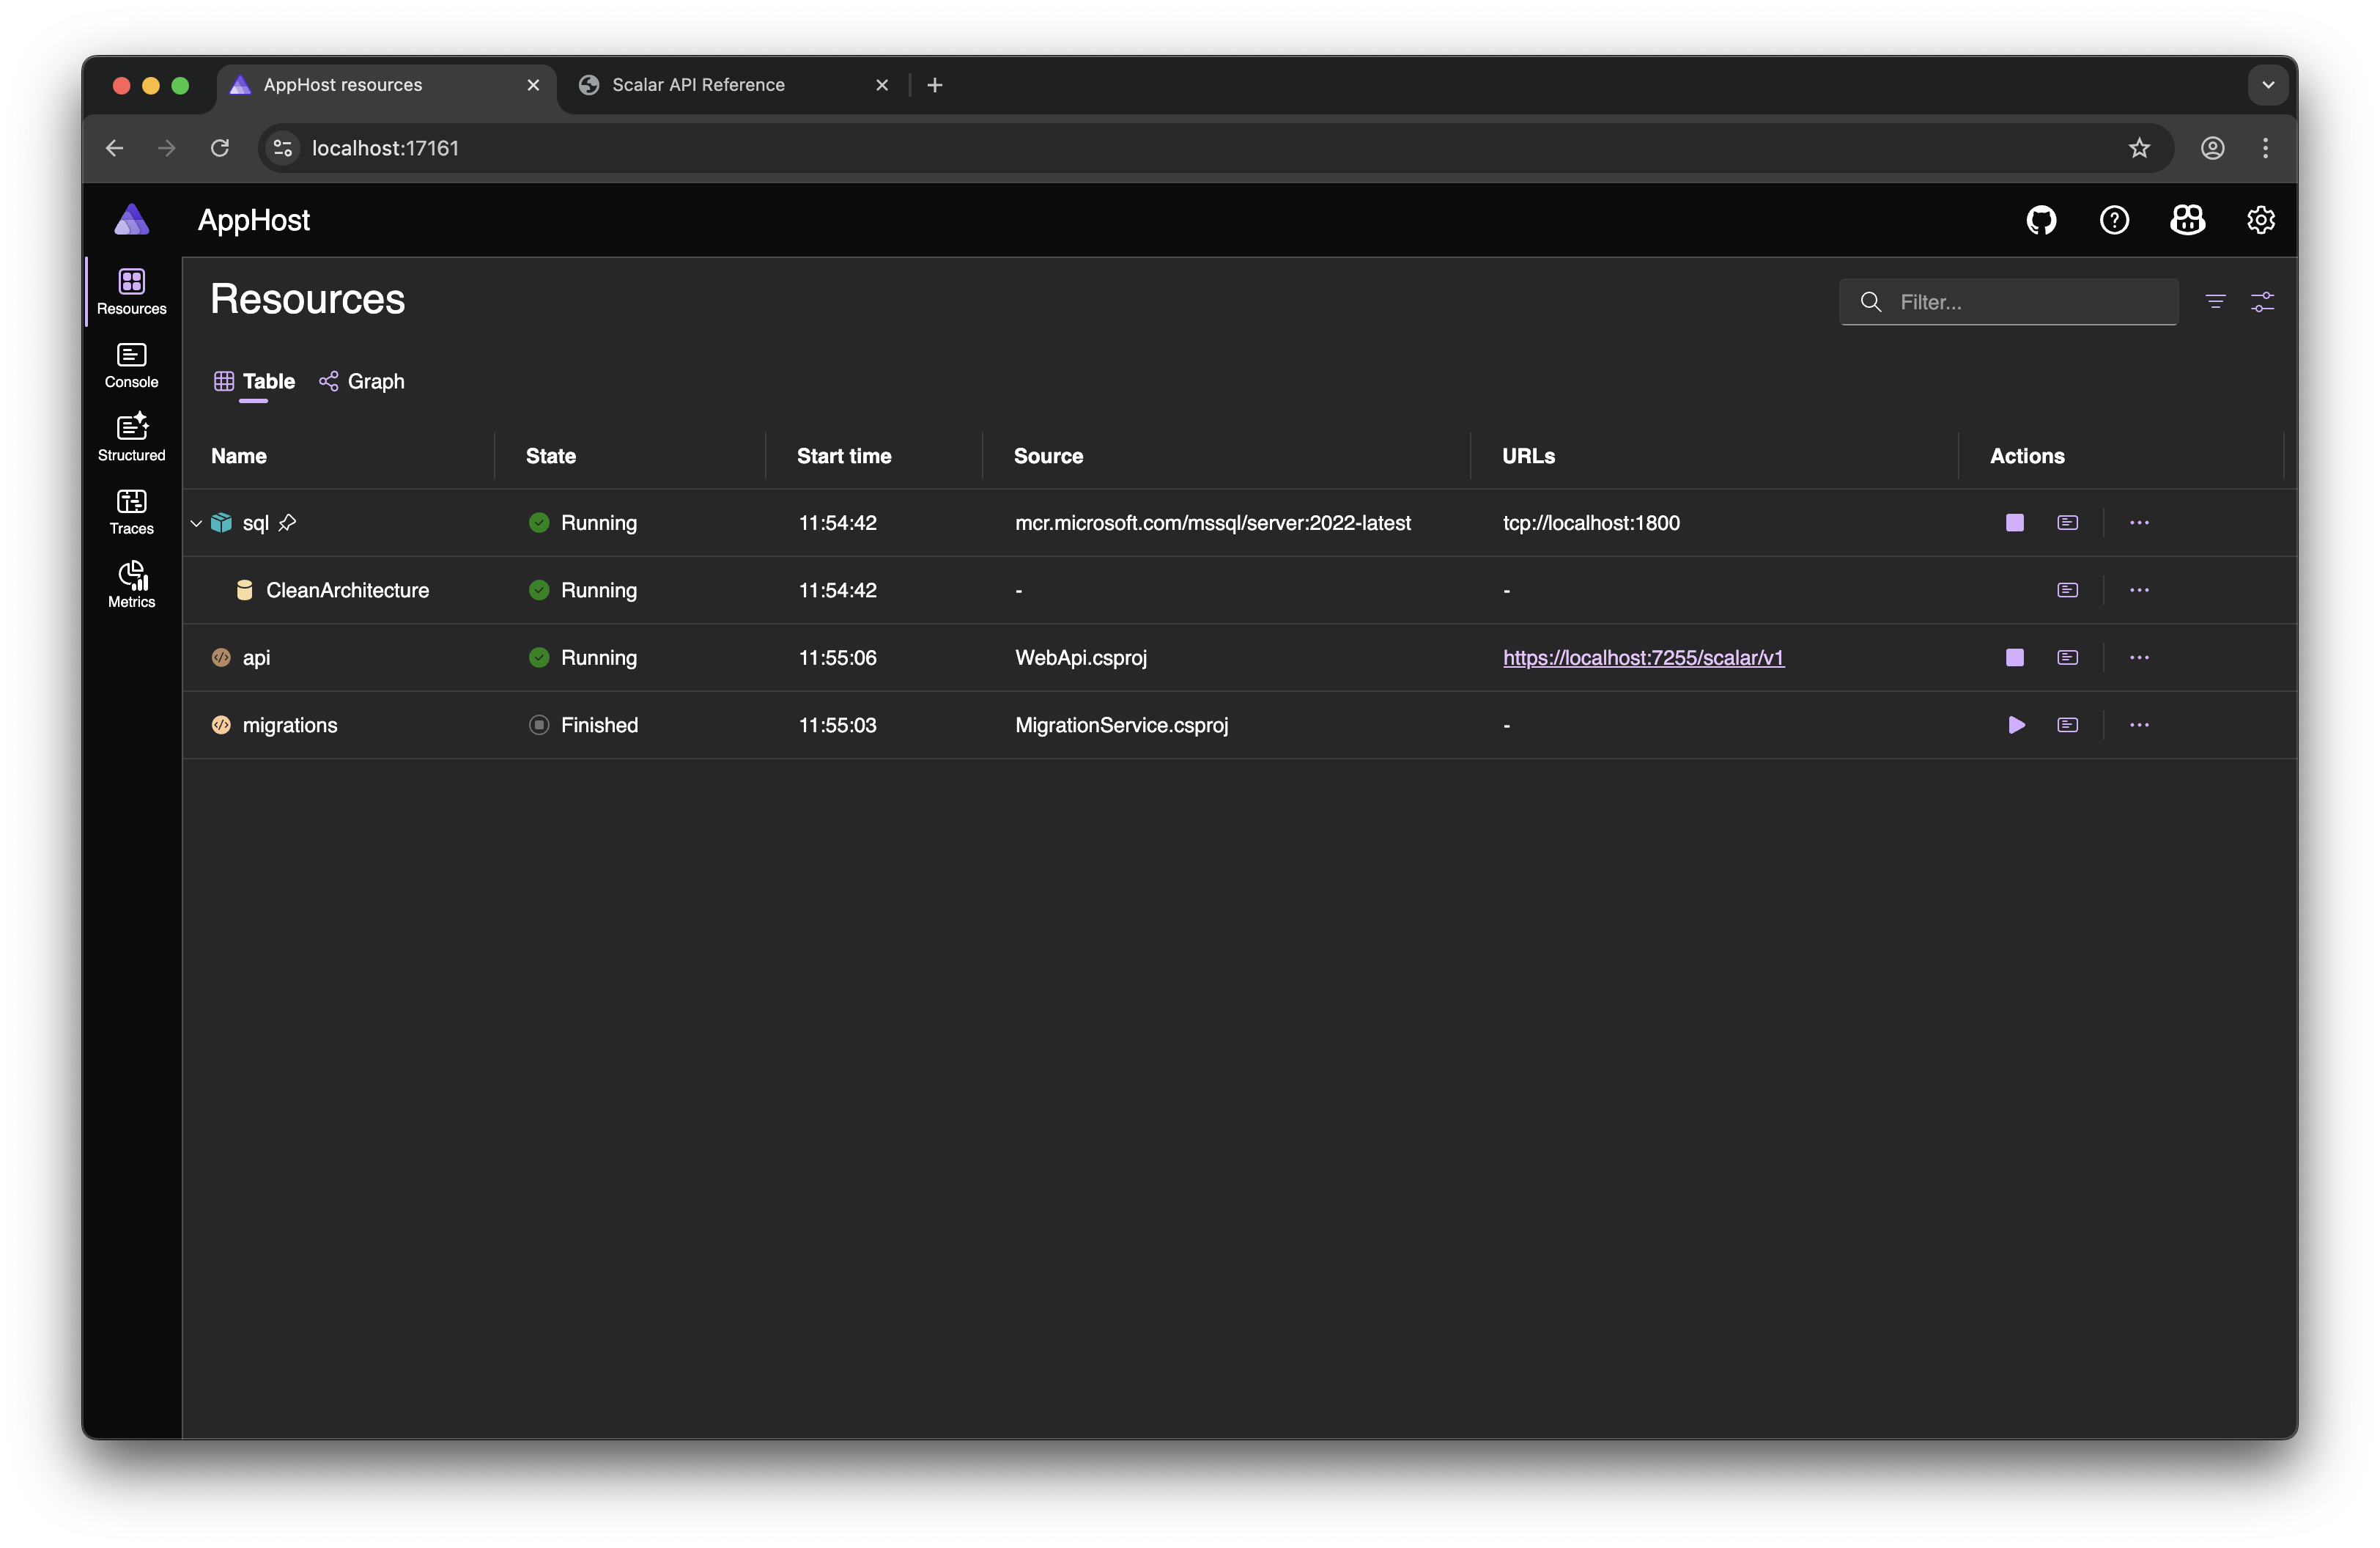
As you can see from both the code and the dashboard below, the solution is composed of:
- SQL Server & Database
- Migration Service: Handles database migrations and test data seeding
- API: The main API service with Entity Framework
using AppHost.Commands;
using Projects;

var builder = DistributedApplication.CreateBuilder(args);

var sqlServer = builder
    .AddSqlServer("sql")
    .WithLifetime(ContainerLifetime.Persistent);

var db = sqlServer
    .AddDatabase("clean-architecture")
    .WithDropDatabaseCommand();

var migrationService = builder.AddProject<MigrationService>("migrations")
    .WithReference(db)
    .WaitFor(sqlServer);

builder
    .AddProject<WebApi>("api")
    .WithEndpoint("https", endpoint => endpoint.IsProxied = false)
    .WithReference(db)
    .WaitForCompletion(migrationService);

builder.Build().Run();
If we navigate to Tools/AppHost and run dotnet run, we can see the Aspire dashboard:
AppHost Modification
Let's get started with modifying AppHost.cs to adapt the Aspire application to use Azure App Services, Azure SQL Database, and Application Insights.
Adding Azure SQL Database
Add nuget packages
cd Tools/AppHostdotnet add package Aspire.Hosting.Azure.Sql --prereleaseUse Azure SQL Database
var sqlServer = builder
    .AddAzureSqlServer("sql")
    .RunAsContainer(container =>
    {
        // Configure SQL Server to run locally as a container
        container.WithLifetime(ContainerLifetime.Persistent);

        // NOTE: this can be removed if you want a random port
        container.WithHostPort(1800);
    });
This is setting up SQL Server to be run in two different ways. When deployed to Azure it will use Azure SQL Database, and when running locally it will run in a container.
Ensure our Database has an appropriate name and schema
var db = sqlServer
    .AddDatabase("CleanArchitecture", "clean-architecture");
    //.WithDropDatabaseCommand();
The
WithDropDatabaseCommandwill need to be rewritten to work with Azure SQL Database. For simplicity, we'll remove it for now.The database name must be set to
CleanArchitecturein order to be used in App Service Configuration. Usages of this inMigrationServiceandInfrastructurealso need to be updated.
Adding Azure App Services
Add nuget packages
cd Tools/AppHostdotnet add package Aspire.Hosting.Azure.AppService --prereleaseAdd App Service Environment
builder.AddAzureAppServiceEnvironment("aspire").ConfigureInfrastructure(infra =>
{
    var plan = infra.GetProvisionableResources()
        .OfType<AppServicePlan>()
        .Single();

    plan.Sku = new AppServiceSkuDescription
    {
        Name = "B1", // Basic tier, 1 core
    };
});
This is needed for the App Service Plan. Here we also have the opportunity to configure the SKU of the App Service Plan to be
B1, which is a basic plan suitable for development and testing. Azure will usually default to a premium plan, so we can save money by doing this. 🤑Configure Migration Service to be an Azure App Service
var migrationService = builder.AddProject<MigrationService>("migrations")
    // 👇 Changed
    .PublishAsAzureAppServiceWebsite((infra, site) =>
    {
        // Needed for hosted service to run
        site.SiteConfig.IsAlwaysOn = true;

        // Dynamically set environment so we can enable seeding of data
        var environment = Environment.GetEnvironmentVariable("ASPNETCORE_ENVIRONMENT");
        var envSetting = new AppServiceNameValuePair { Name = "ASPNETCORE_ENVIRONMENT", Value = environment };
        site.SiteConfig.AppSettings.Add(new BicepValue<AppServiceNameValuePair>(envSetting));
    })
    // 👆 Changed
    .WithReference(db)
    .WaitFor(sqlServer);
This is configuring the Migration Service to be deployed as an Azure App Service.
Notice we can access the underlying infrastructure to enable configuration such as
IsAlwaysOnand setting environment variables. This is very powerful as it allows us to configure the App Service in a way that suits our needs. 💪Configure API to be an Azure App Service
// 👇 Changed
var api = builder
    .AddProject<WebApi>("api")
    .WithExternalHttpEndpoints()
    // No need to use builder.PublishAsAzureAppServiceWebsite() here, as that is the default due to builder.AddAzureAppServiceEnvironment()
    .WithReference(db)
    .WaitForCompletion(migrationService);
// 👆 Changed
Adding Application Insights
Let's add Application Insights to our Aspire application to monitor performance and errors. We will only add this when deploying to Azure, as we can a combination of OpenTelemetry and the Aspire Dashboard to monitor our application locally.
Add nuget packages
cd Tools/AppHostdotnet add package Aspire.Hosting.Azure.ApplicationInsightsAdd Application Insights to the Aspire application
if (builder.ExecutionContext.IsPublishMode)
{
    var logAnalytics = builder.AddAzureLogAnalyticsWorkspace("log-analytics");
    var insights = builder.AddAzureApplicationInsights("insights", logAnalytics);
    api.WithReference(insights);
    migrationService.WithReference(insights);
}
This will add Application Insights to the Aspire application only when publishing to Azure. Notice we are also adding a Log Analytics Workspace, which is required for Application Insights to work properly.
Only when we are using Application Insights, do we need to add the references to
apiandmigrationServiceprojects.
Deployment Process
Now that we have our Aspire application set up with Azure SQL Database, Azure App Services and Application Insights, let's walk through the deployment process using the Azure Developer CLI (AZD).
Step 1: Authenticate with Azure
Ensure you are logged into the correct Tenant in Azure:
azd auth loginNote, you can also use
azd auth login --tenant-id <tenant-id>if you want to login directly to a specific tenant.
Step 2: Initialize AZD
Init AZD
cd Tools/AppHostazd initThis will initialize the Azure Developer CLI in your project directory.
Let AZD scan for your Aspire application
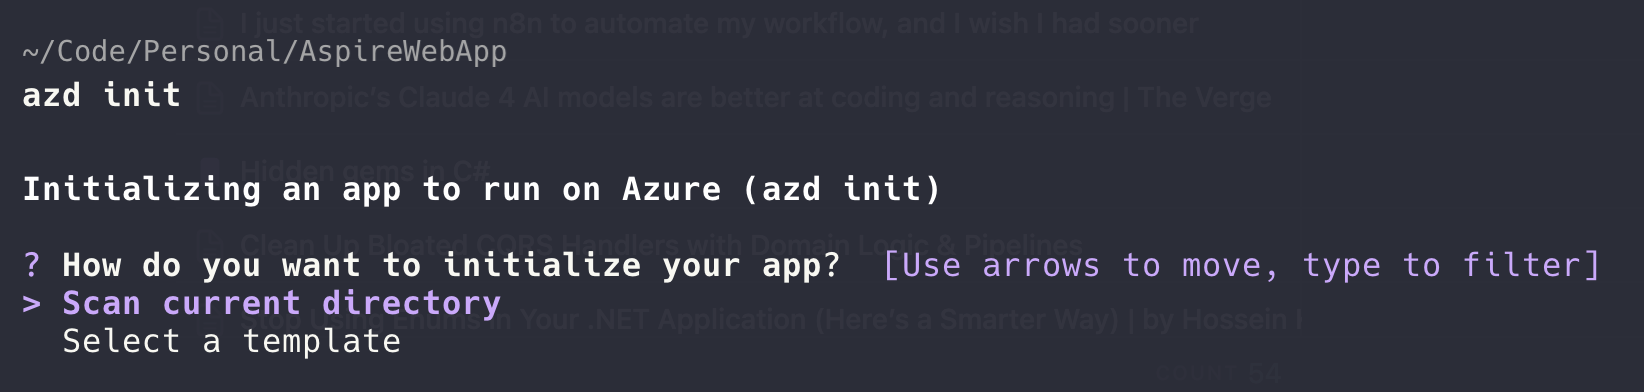
Figure: azd init Confirm
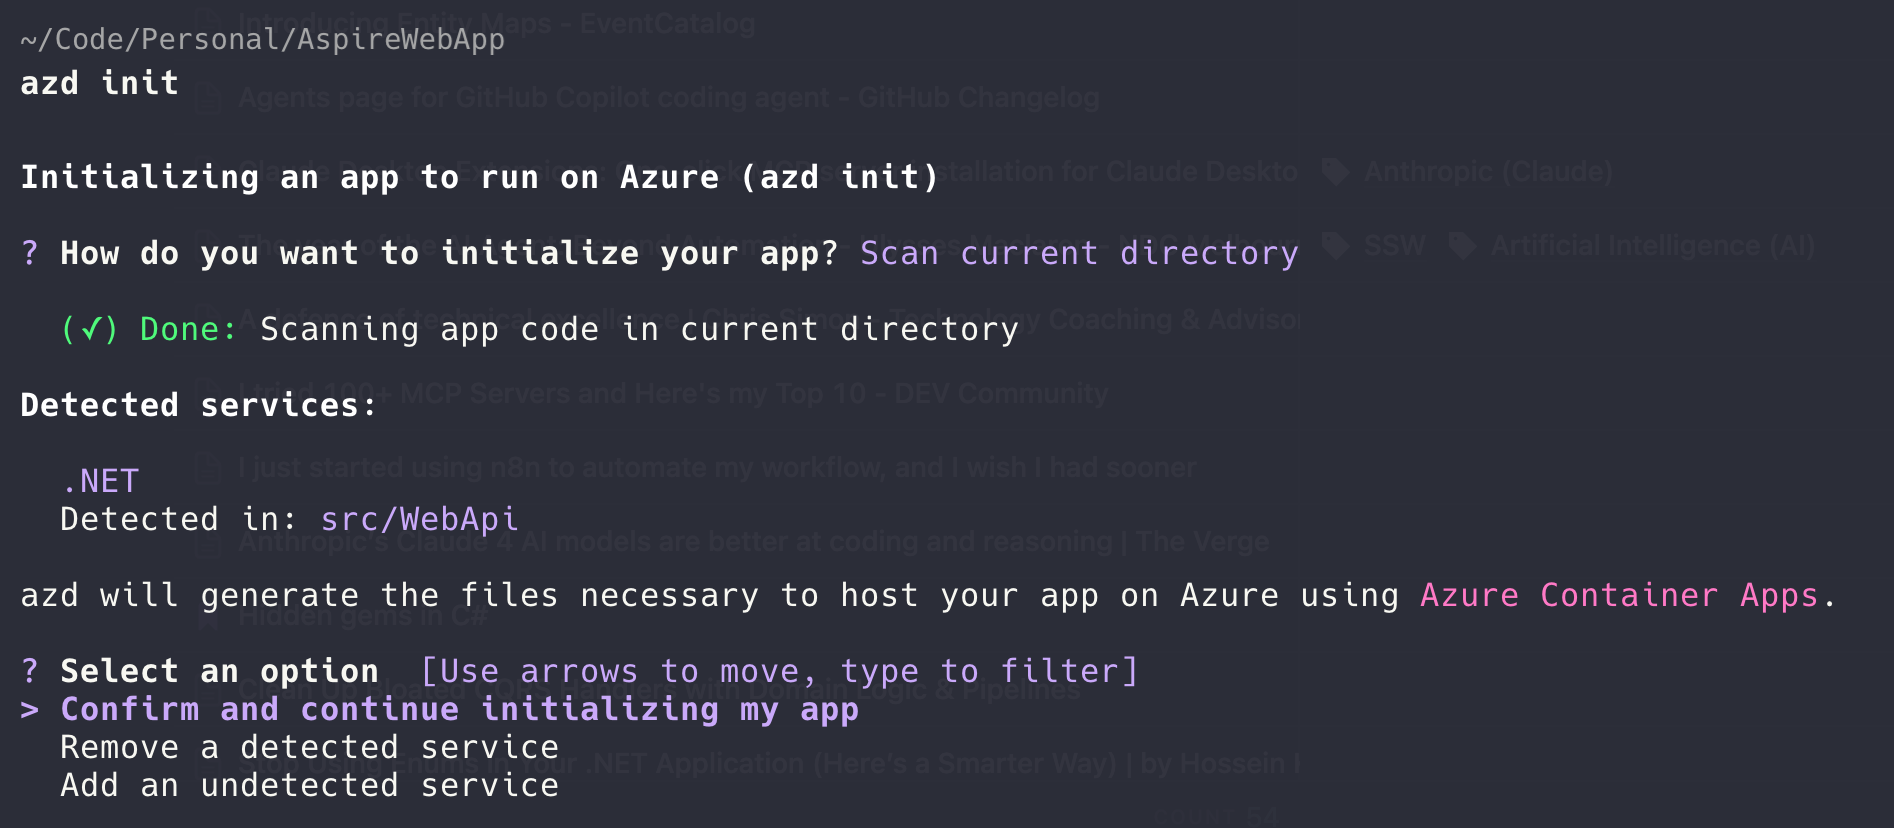
Figure: azd init Init done!
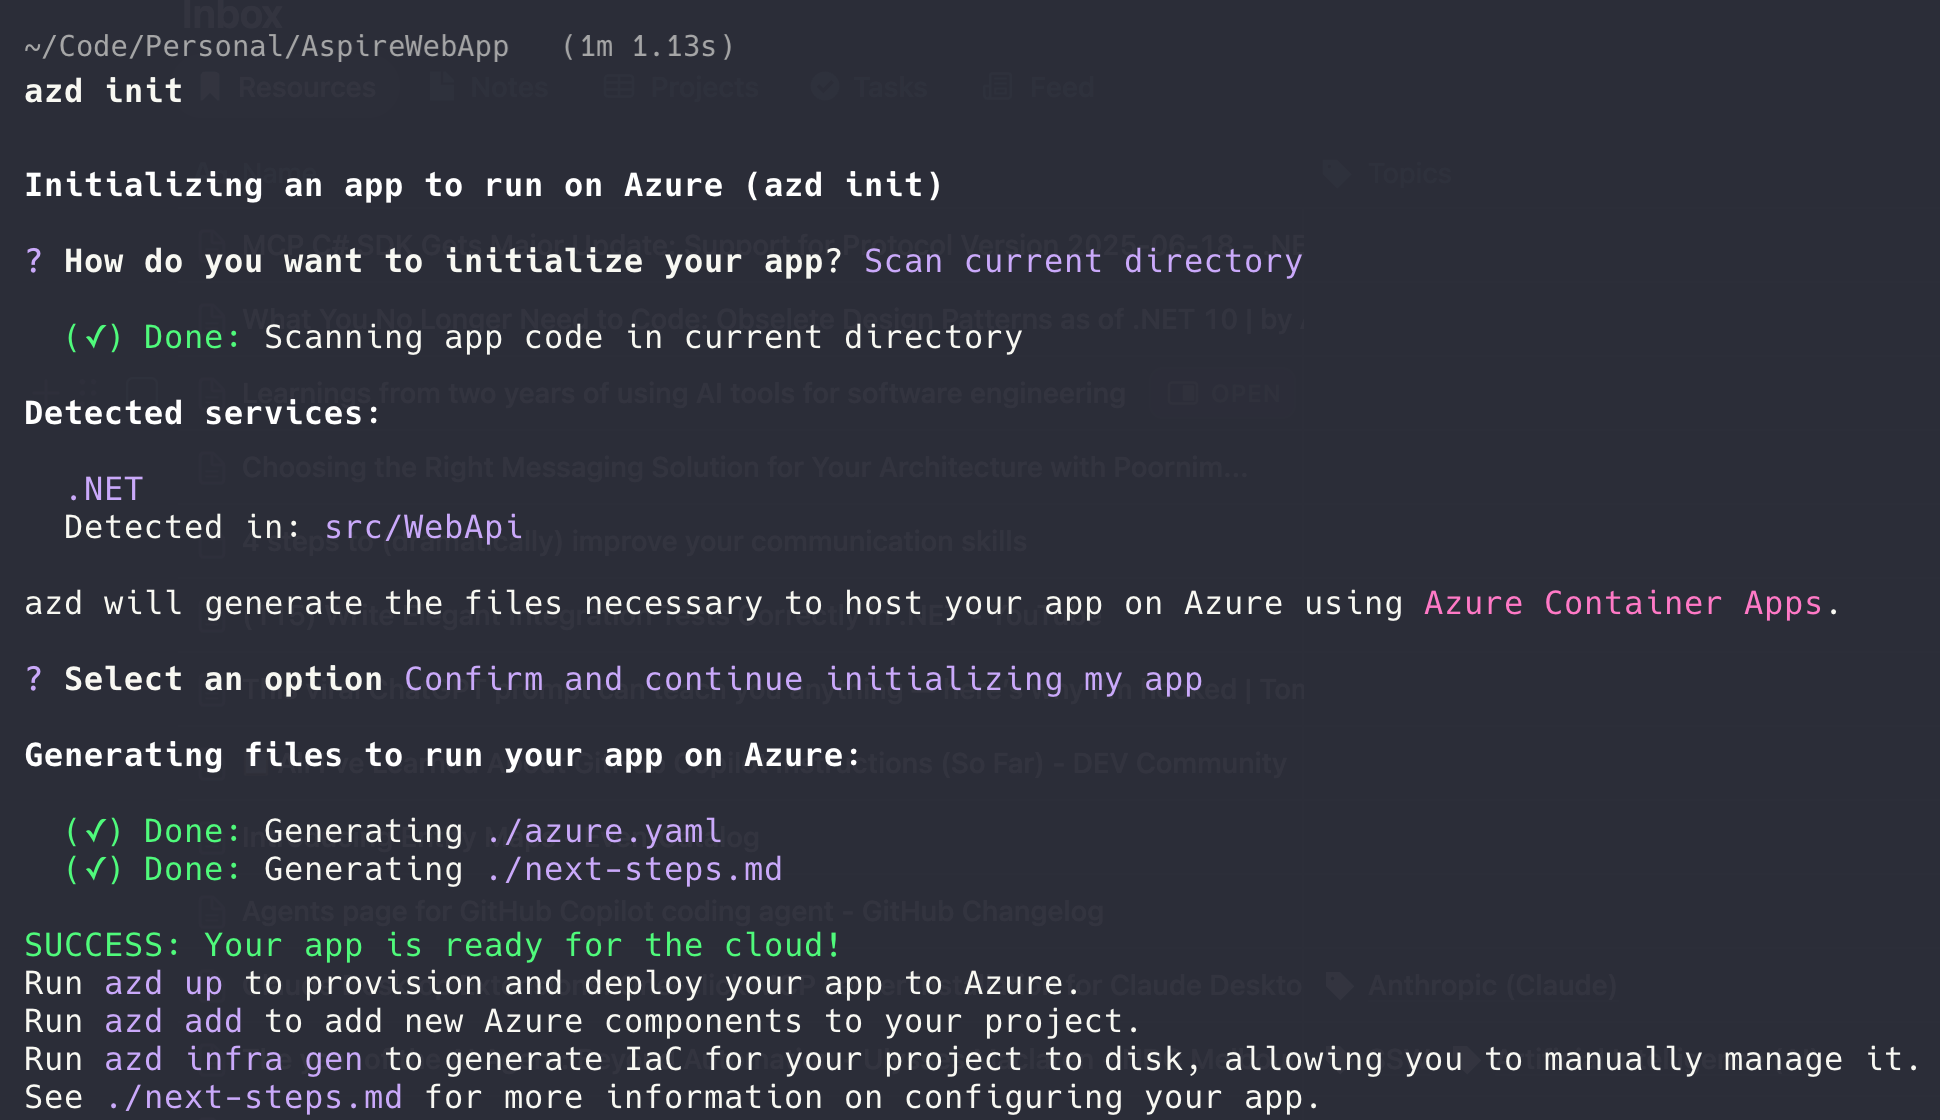
Figure: azd init
Step 3: Set Environment Variables
In order for the MigrationService to seed the database with test data, we need to set the ASPNETCORE_ENVIRONMENT environment variable to Development:
Update environment variables
azd env set ASPNETCORE_ENVIRONMENT Development
Step 4: Deploy to Azure
The azd up command will create the resources defined in the manifest and deploy the application to Azure. This combines azd package, azd provision and azd deploy commands. While azd up is convenient, you can also run the commands separately if you need more control over the deployment process.
Deploy app:
azd upThis will ask you to confirm the subscription and the region you want to deploy to.
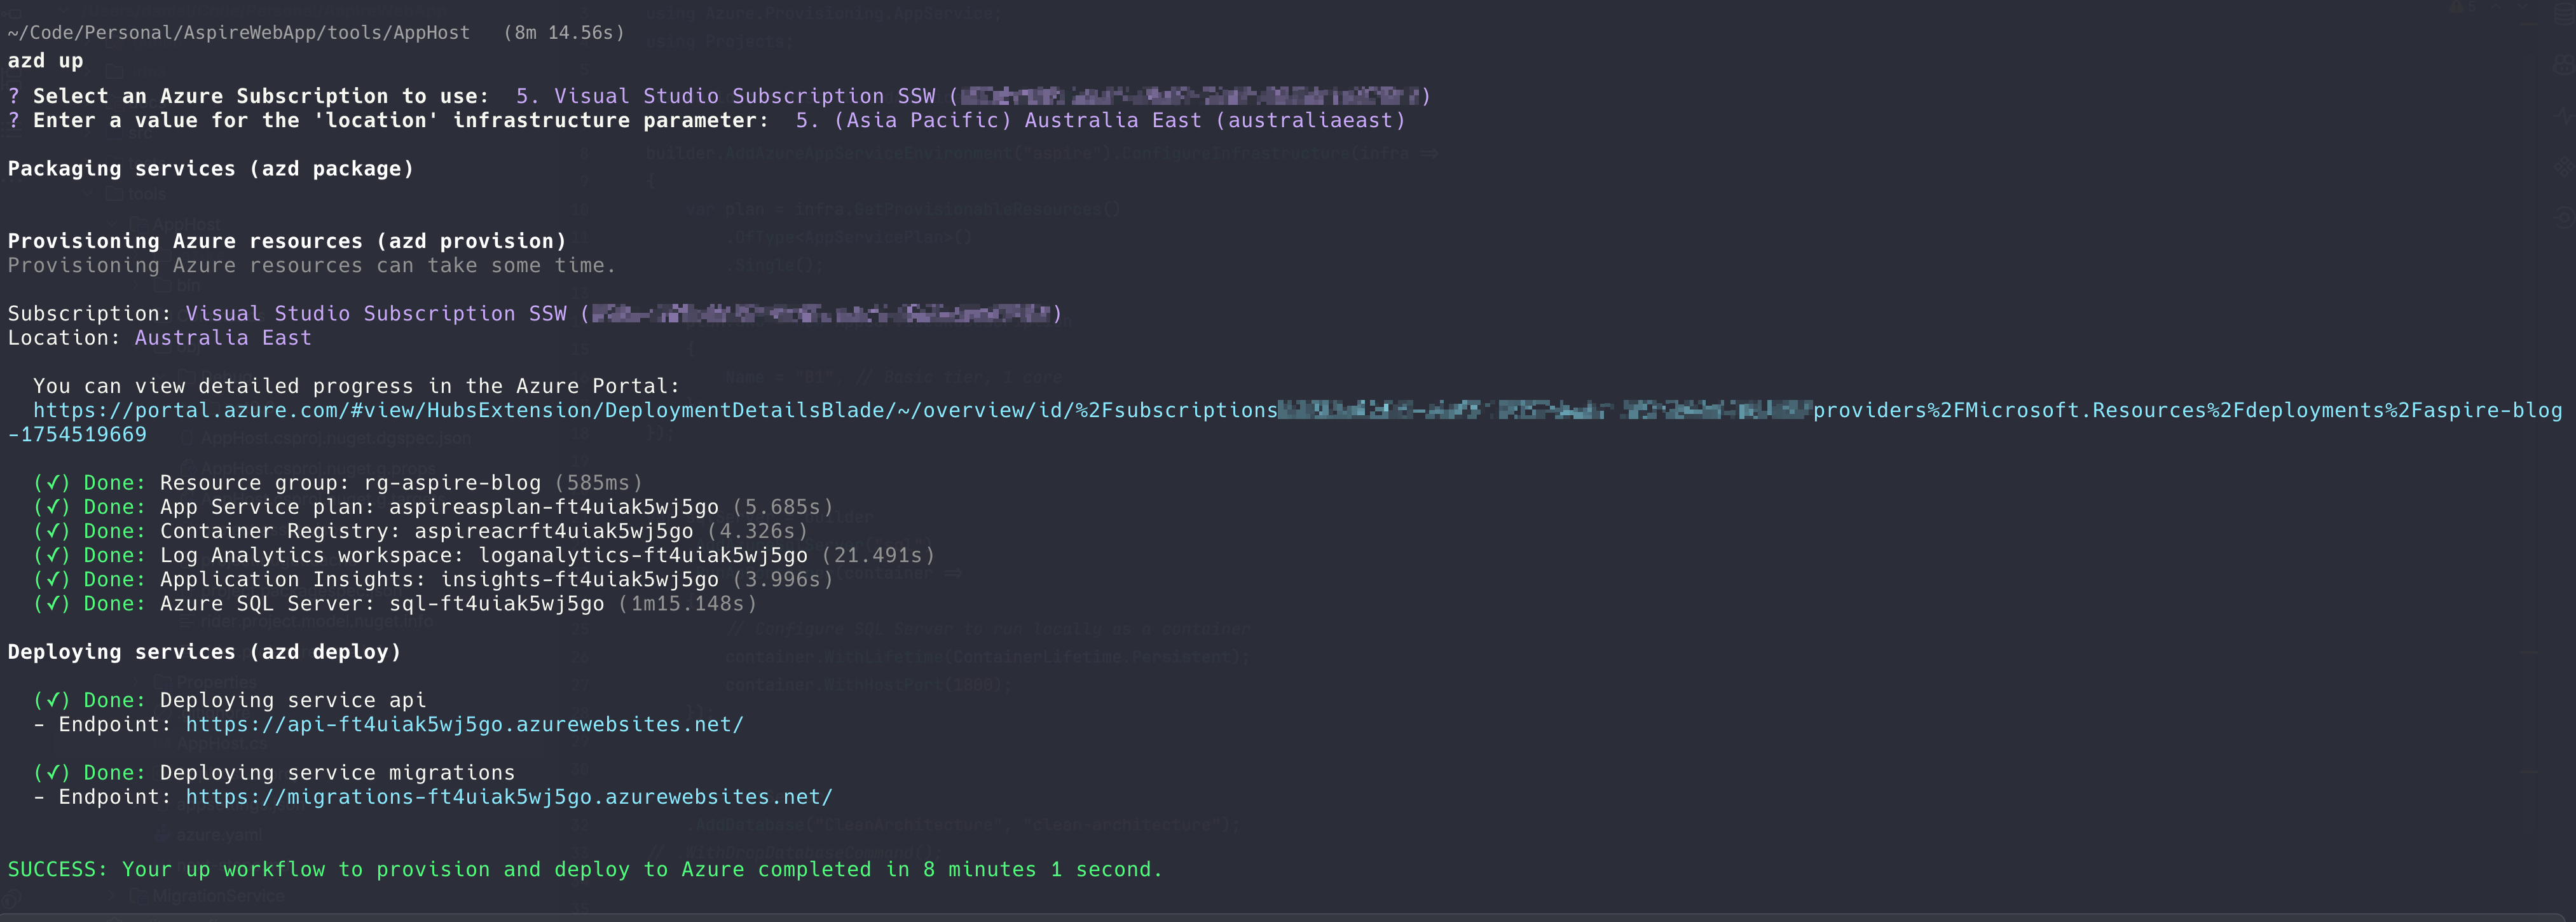
Figure: azd up
Step 5: Confirm Deployment
Login to the Azure Portal
Confirm all resources were created as expected
- Azure App Service for the API
- Azure App Service for the Migration Service
- Azure SQL Database
- Application Insights
- Log Analytics Workspace
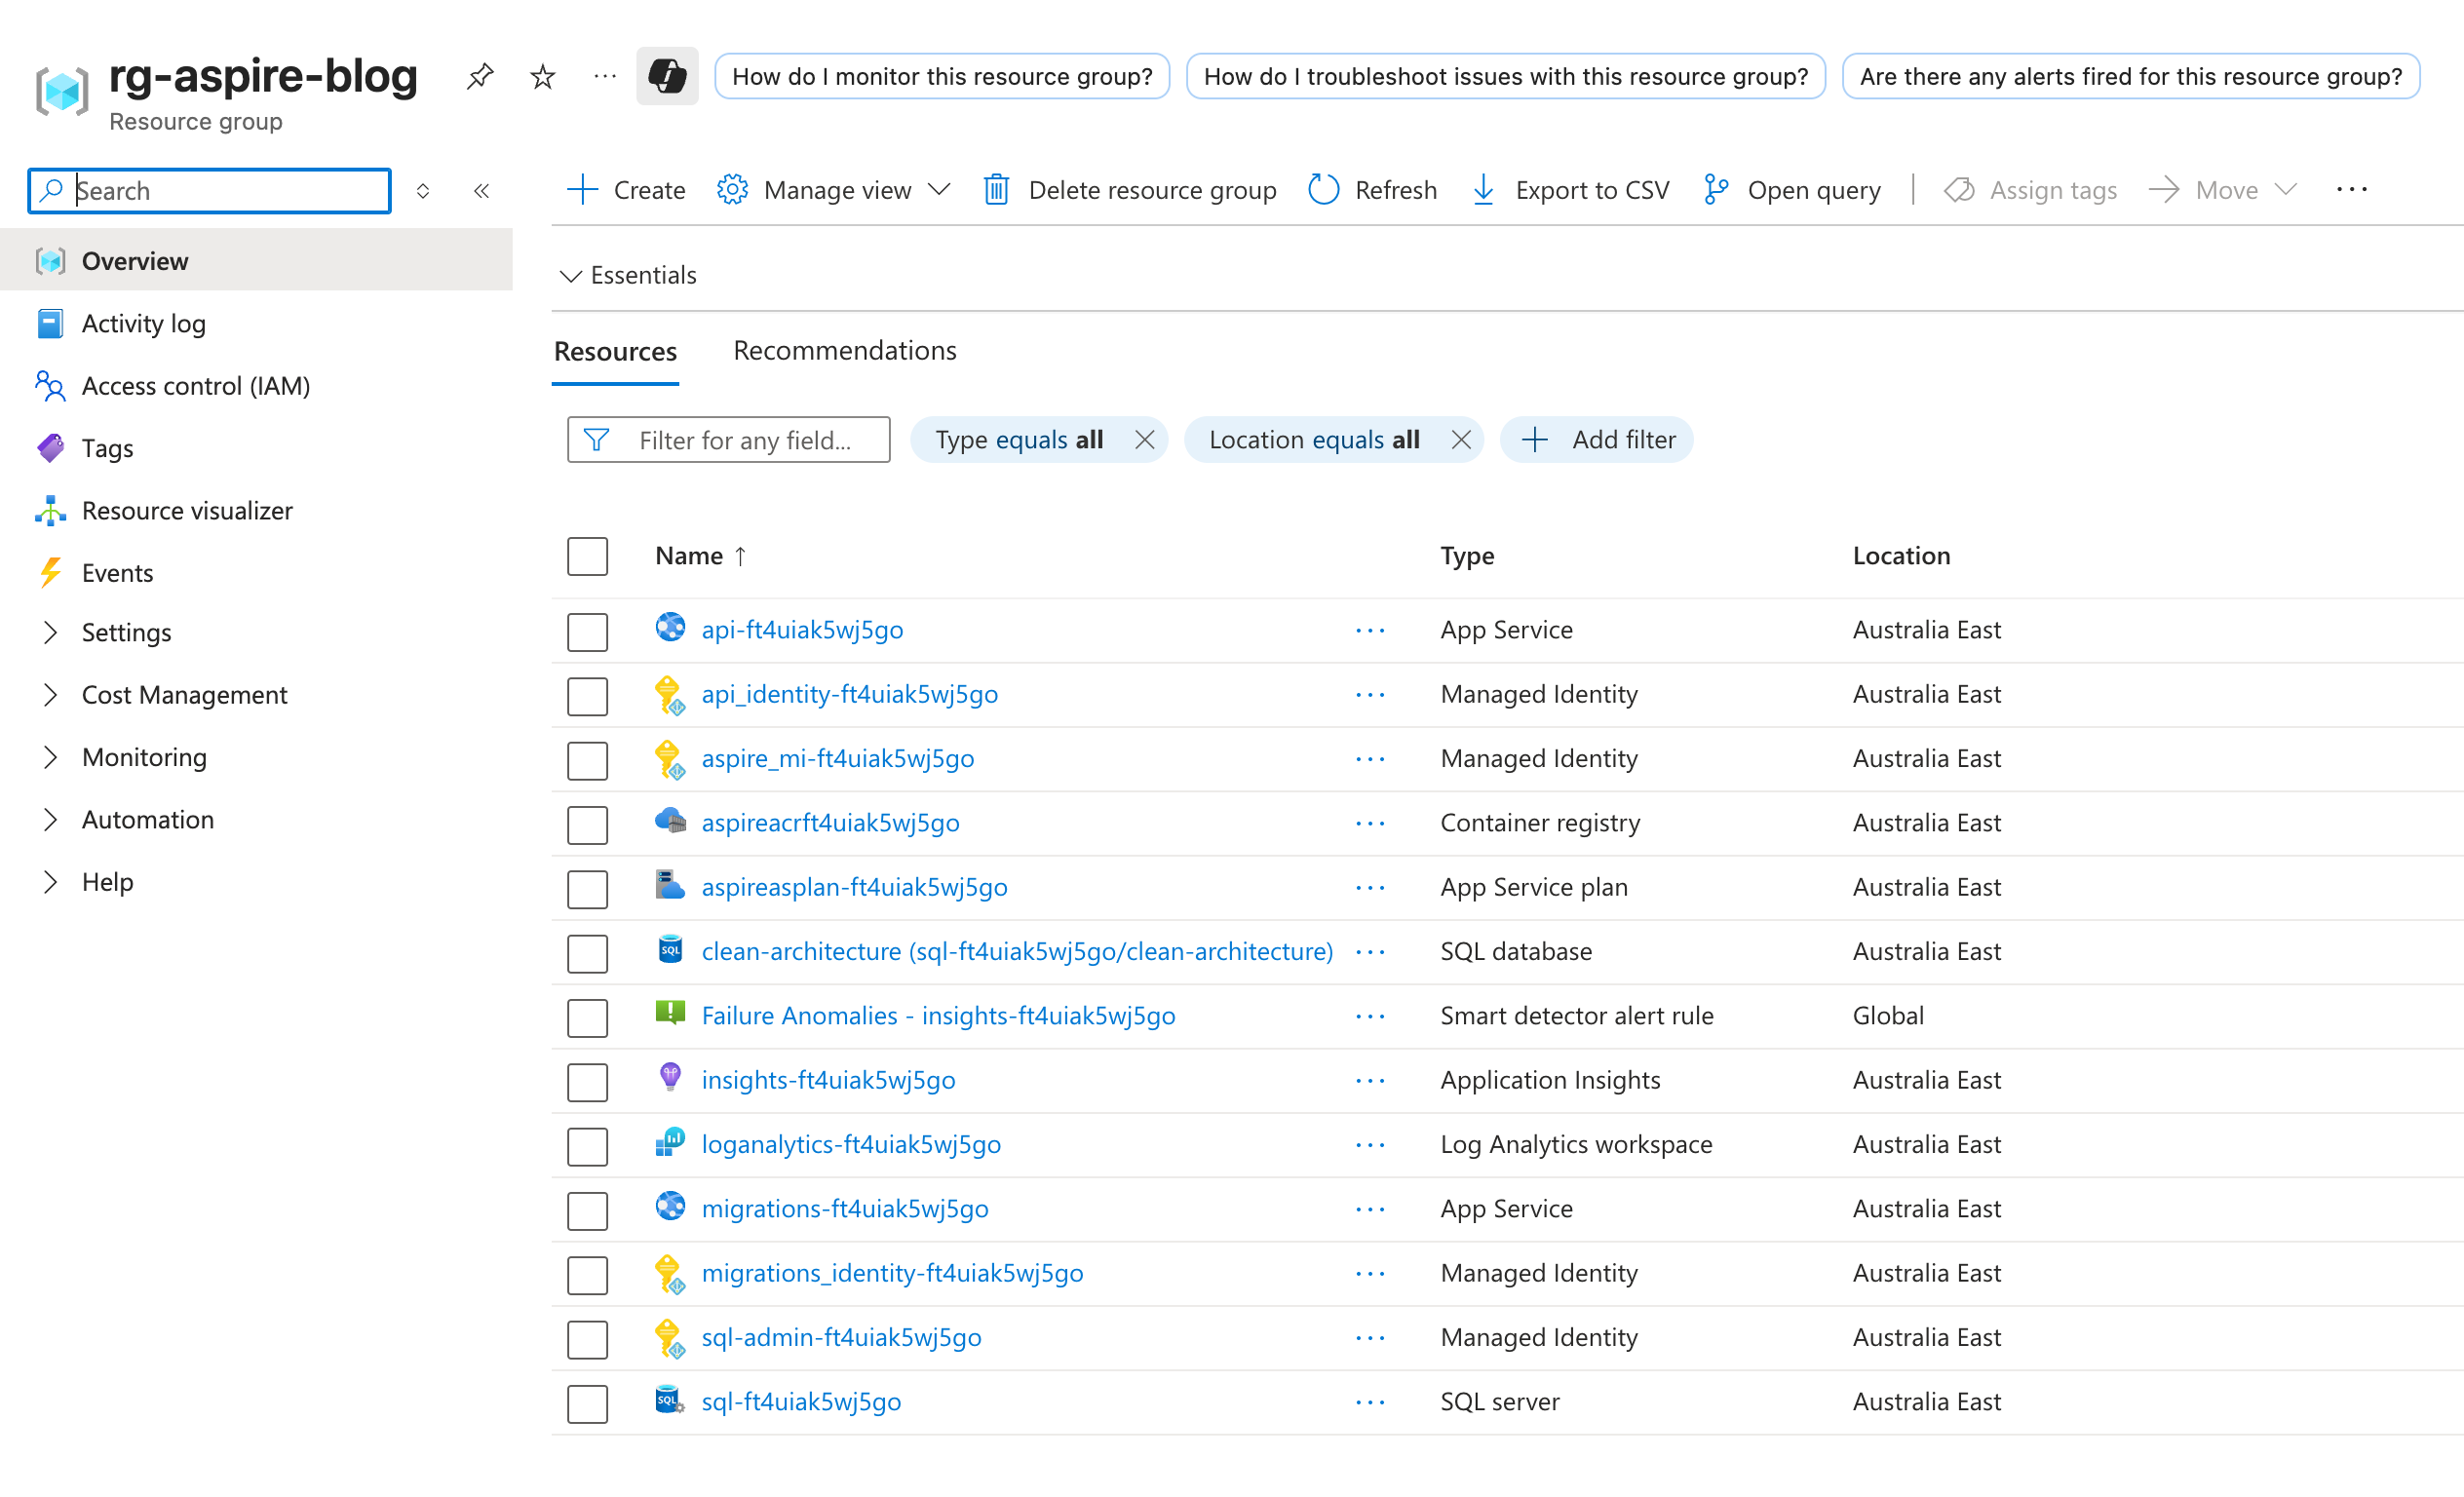
Figure: all resources deployed to Azure You will also notice there are a few extra resources that have been configured:
- Managed Identities: These allow us to configure robust security for our services to access the Azure SQL DB without needing to manage secrets.
- Container Registry: When deploying to App Service on Linux, container images are built and pushed to a container registry. The App Service will pull new images from the registry when deploying application updates.
- Failure Anomalies: Configures alerts to send emails if there are any 'abnormal failures' in the application. This is useful for monitoring the health of the application.
Confirm App Service Plan configuration
We configured Aspire to use a Basic App Service Plan (B1) for cost efficiency. You can confirm this in the Azure Portal:
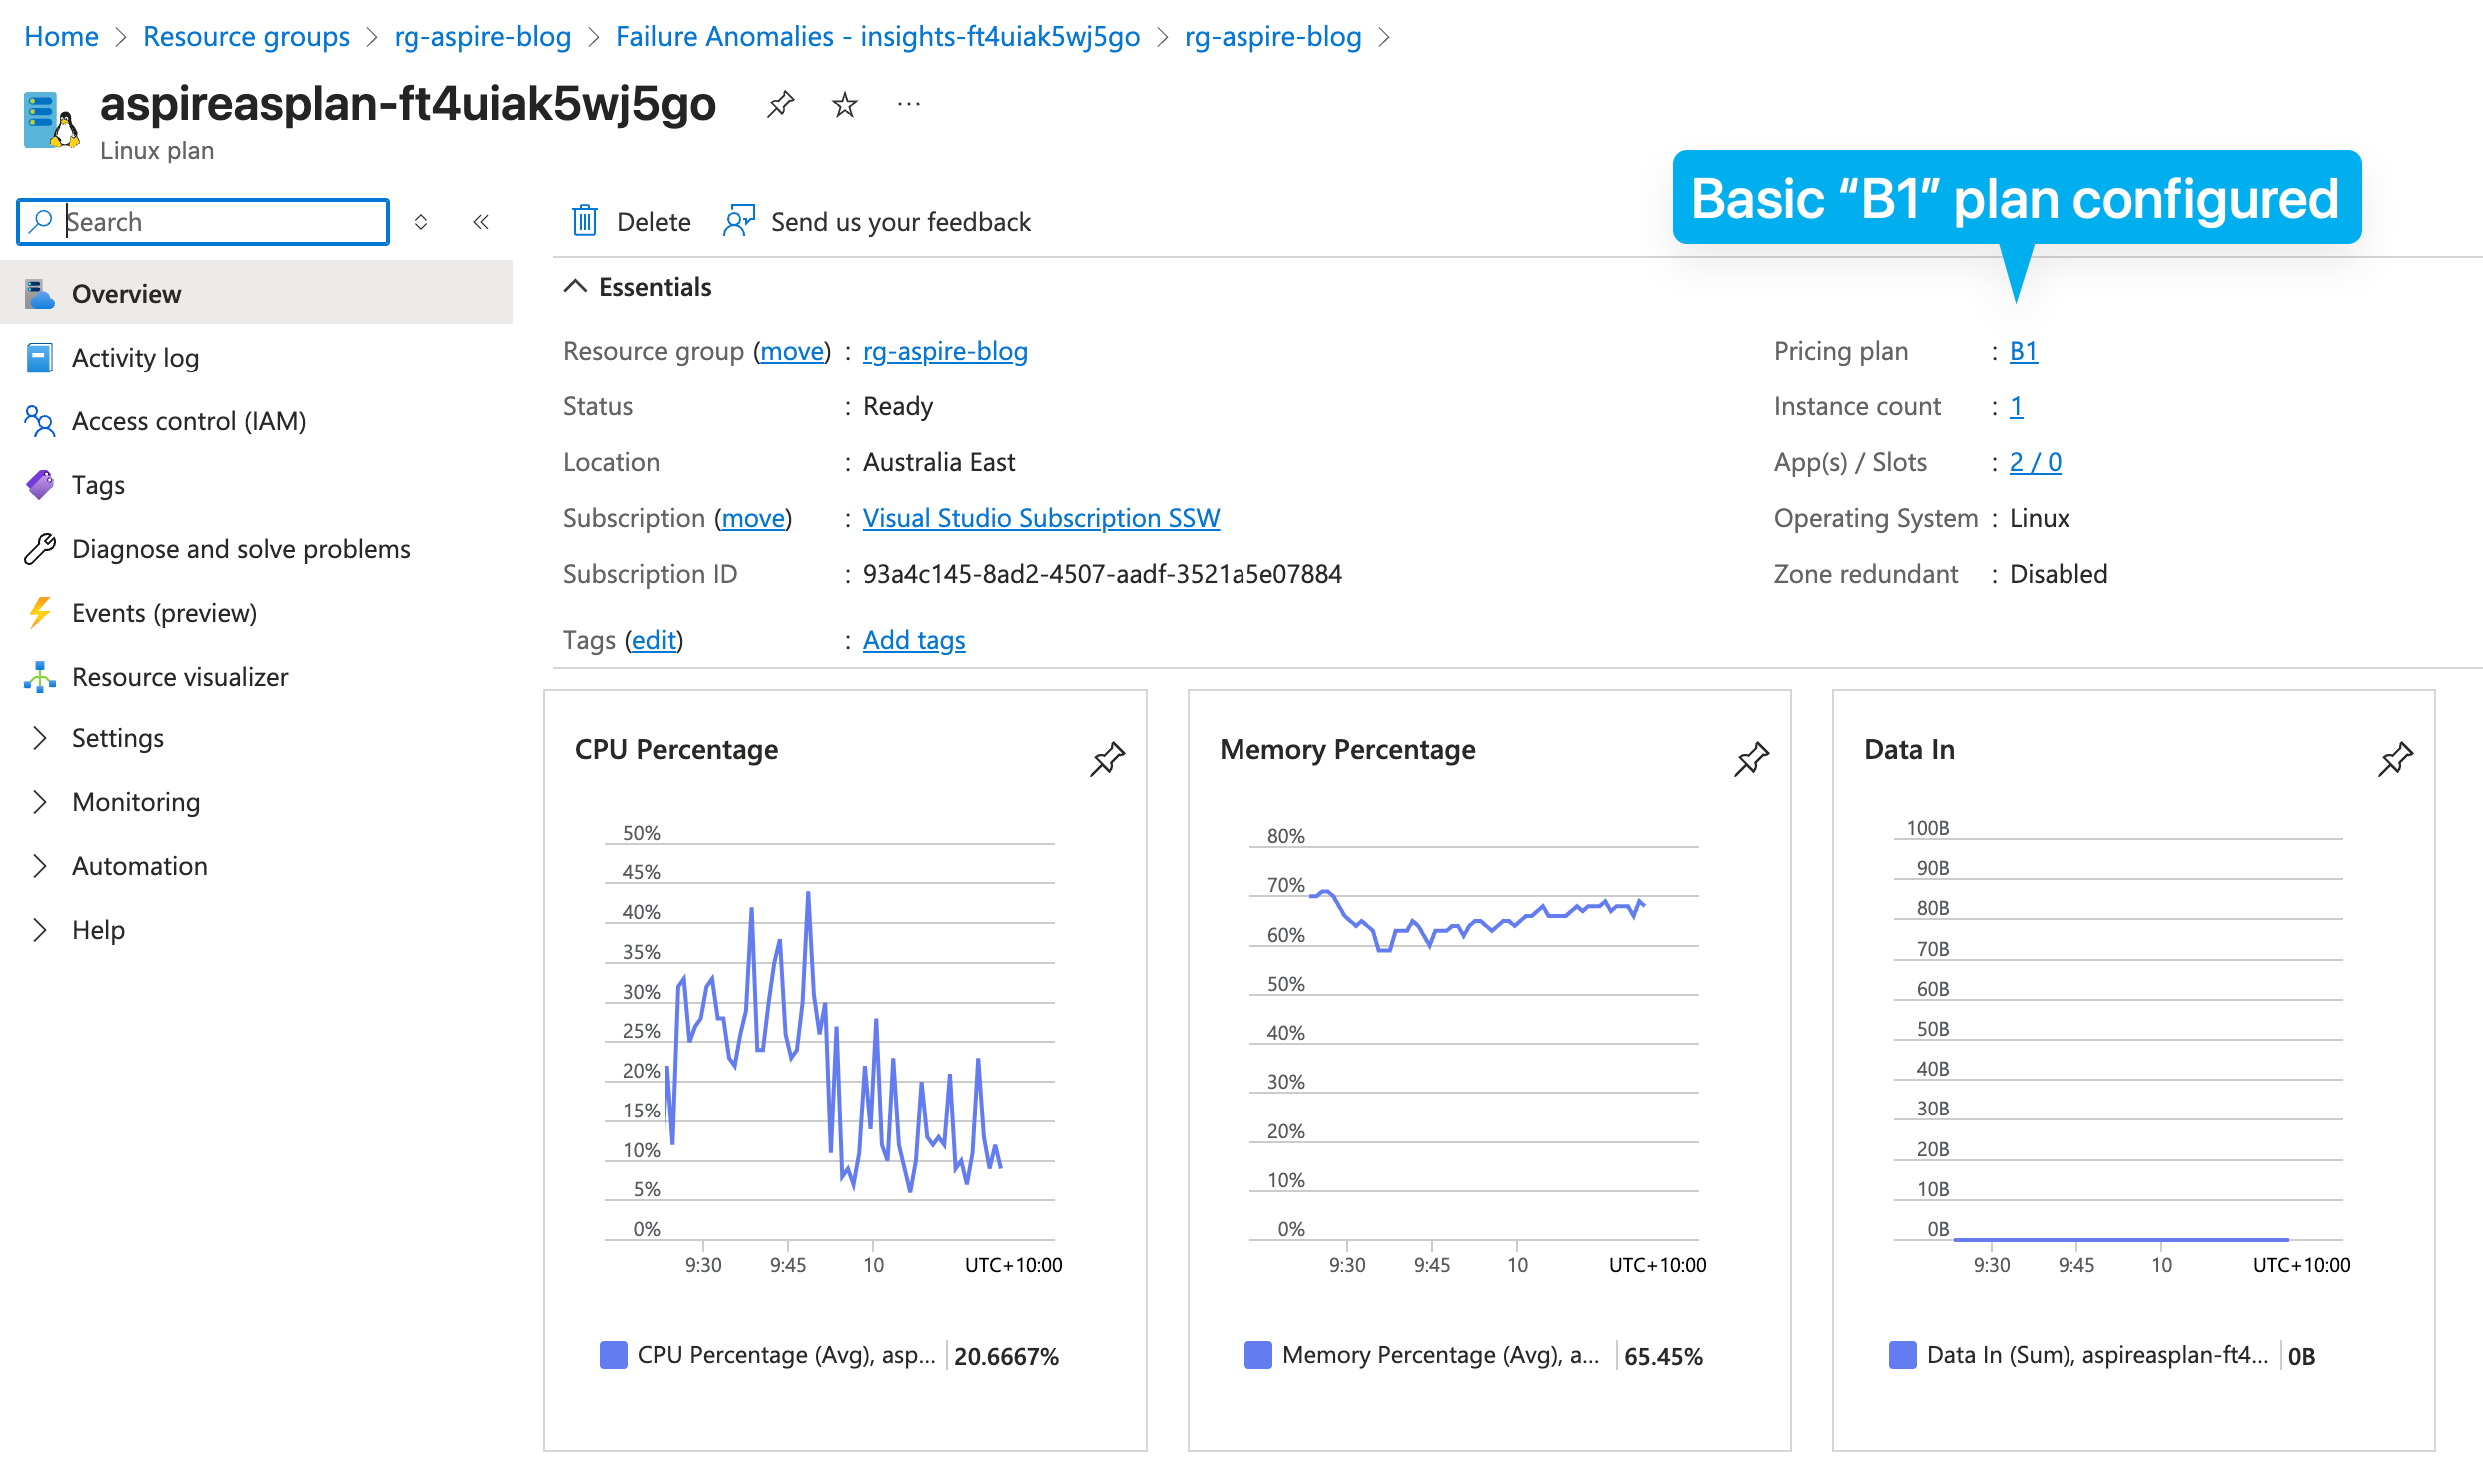
Figure: App Service Plan is configured as expected Confirm App Service configuration
We configured our Migration App Service to be always on, and to use the
ASPNETCORE_ENVIRONMENTenvironment variable. You can confirm this in the Azure Portal: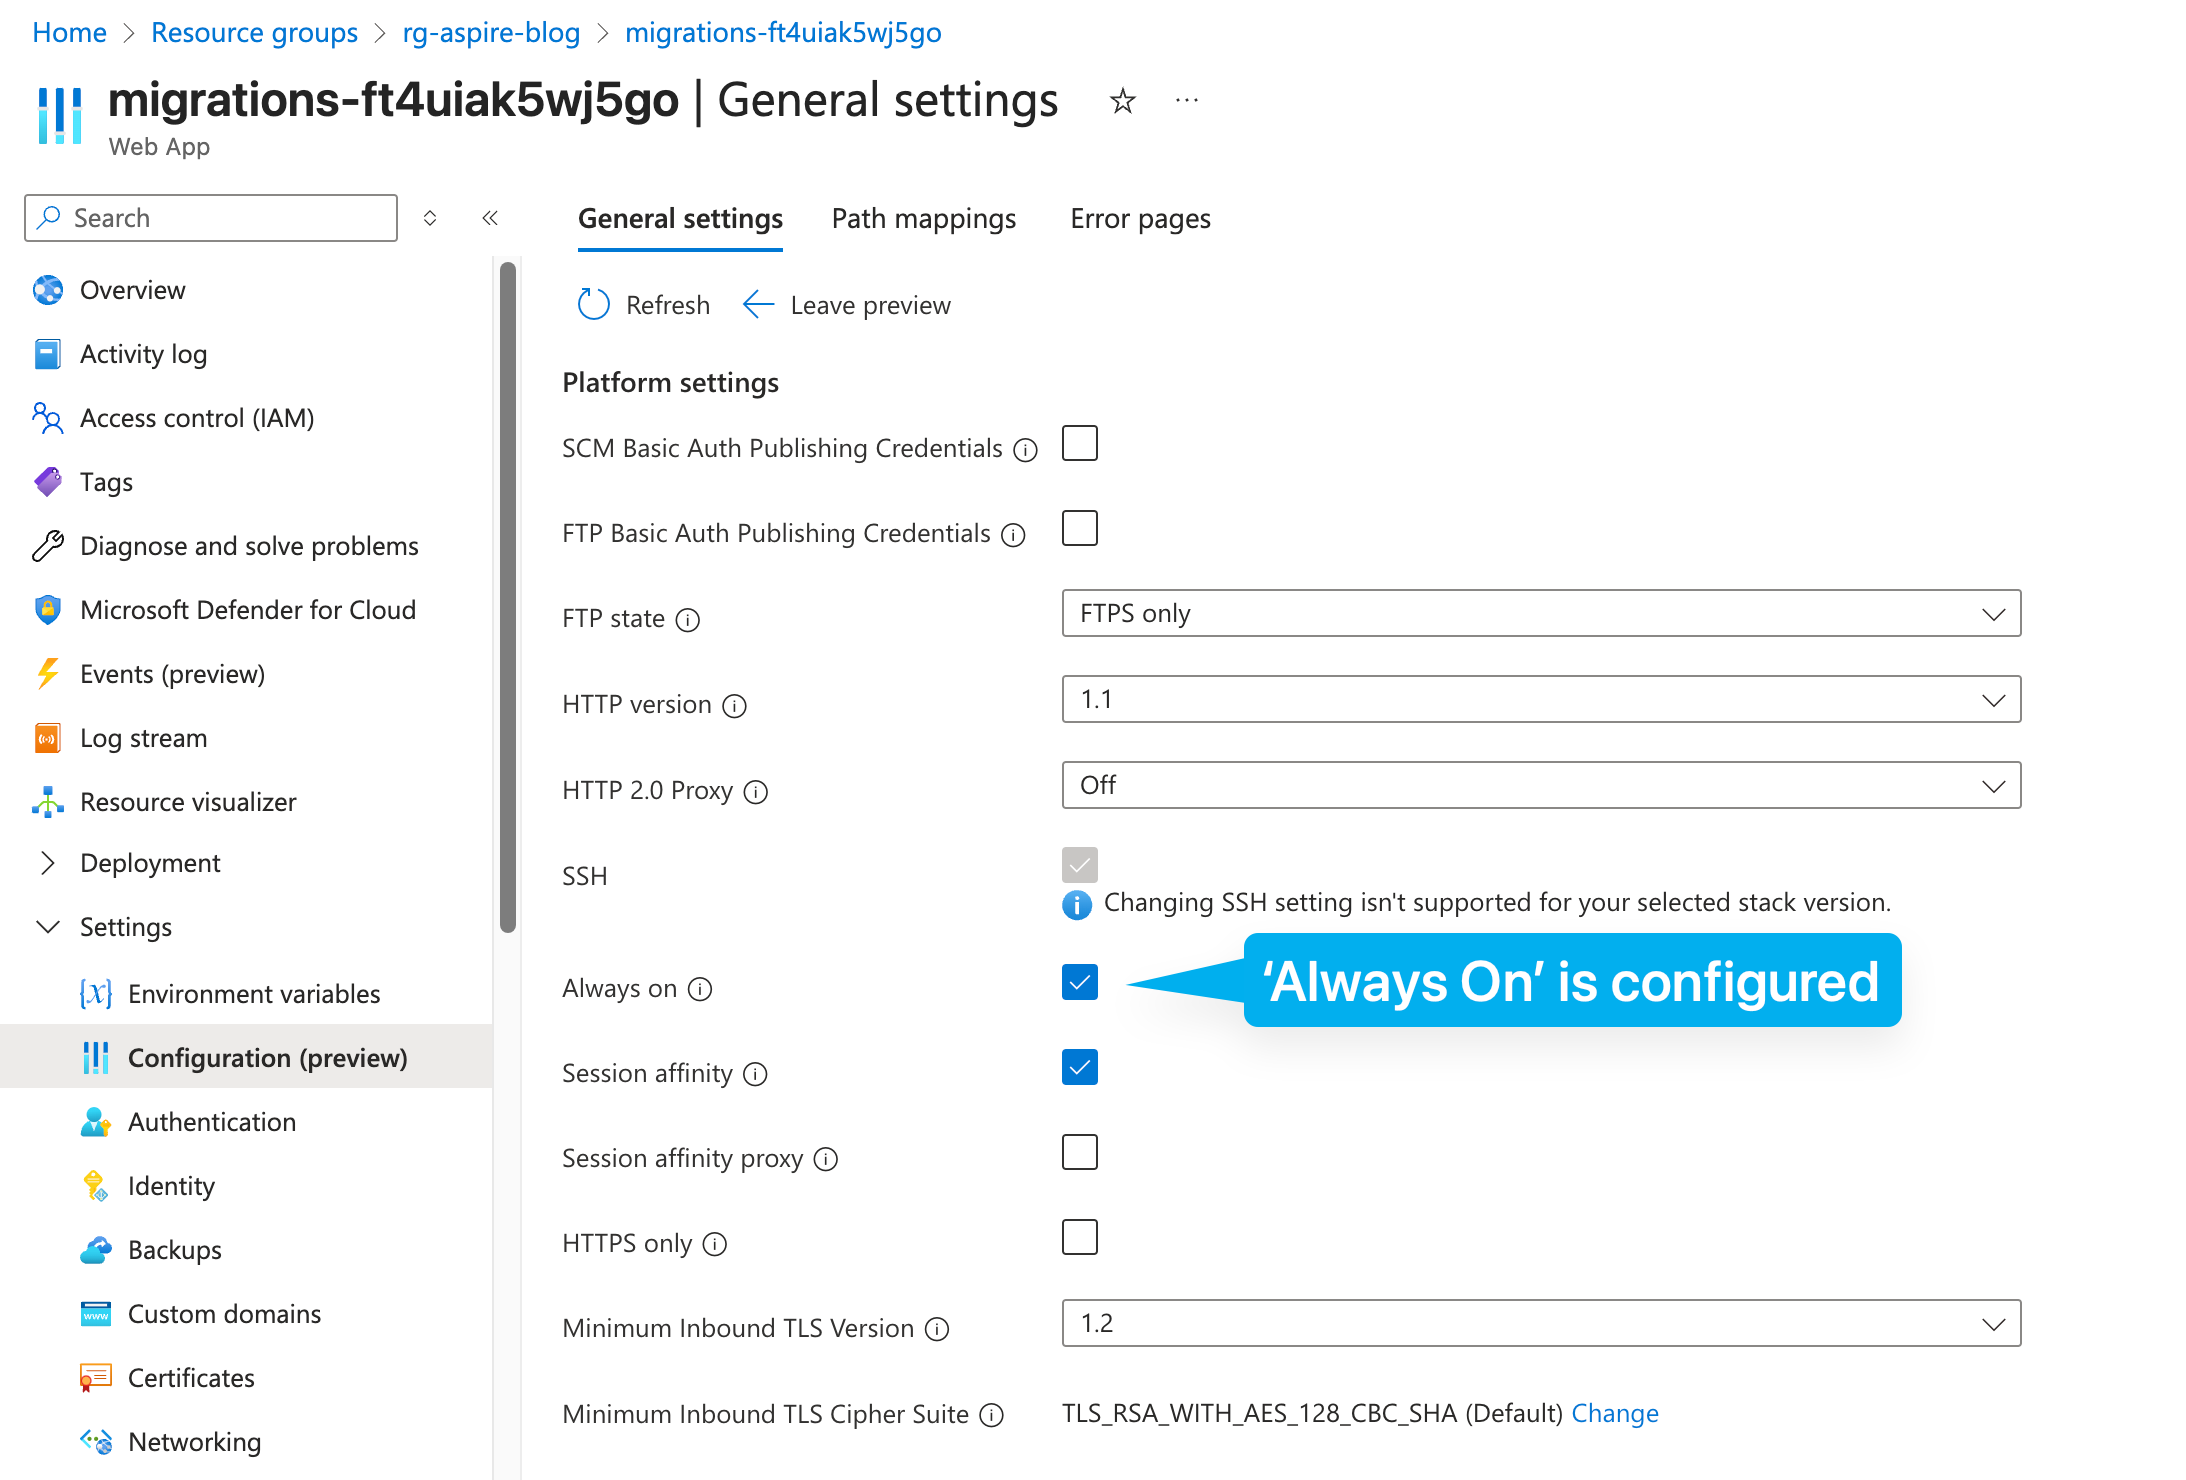
Figure: App Service is configured with 'Always On' We also configured the
ASPNETCORE_ENVIRONMENTenvironment variable to beDevelopment, which allows the Migration Service to seed the database with test data.When deploying to Azure, we also configured Application Insights and Log Analytics Workspace.
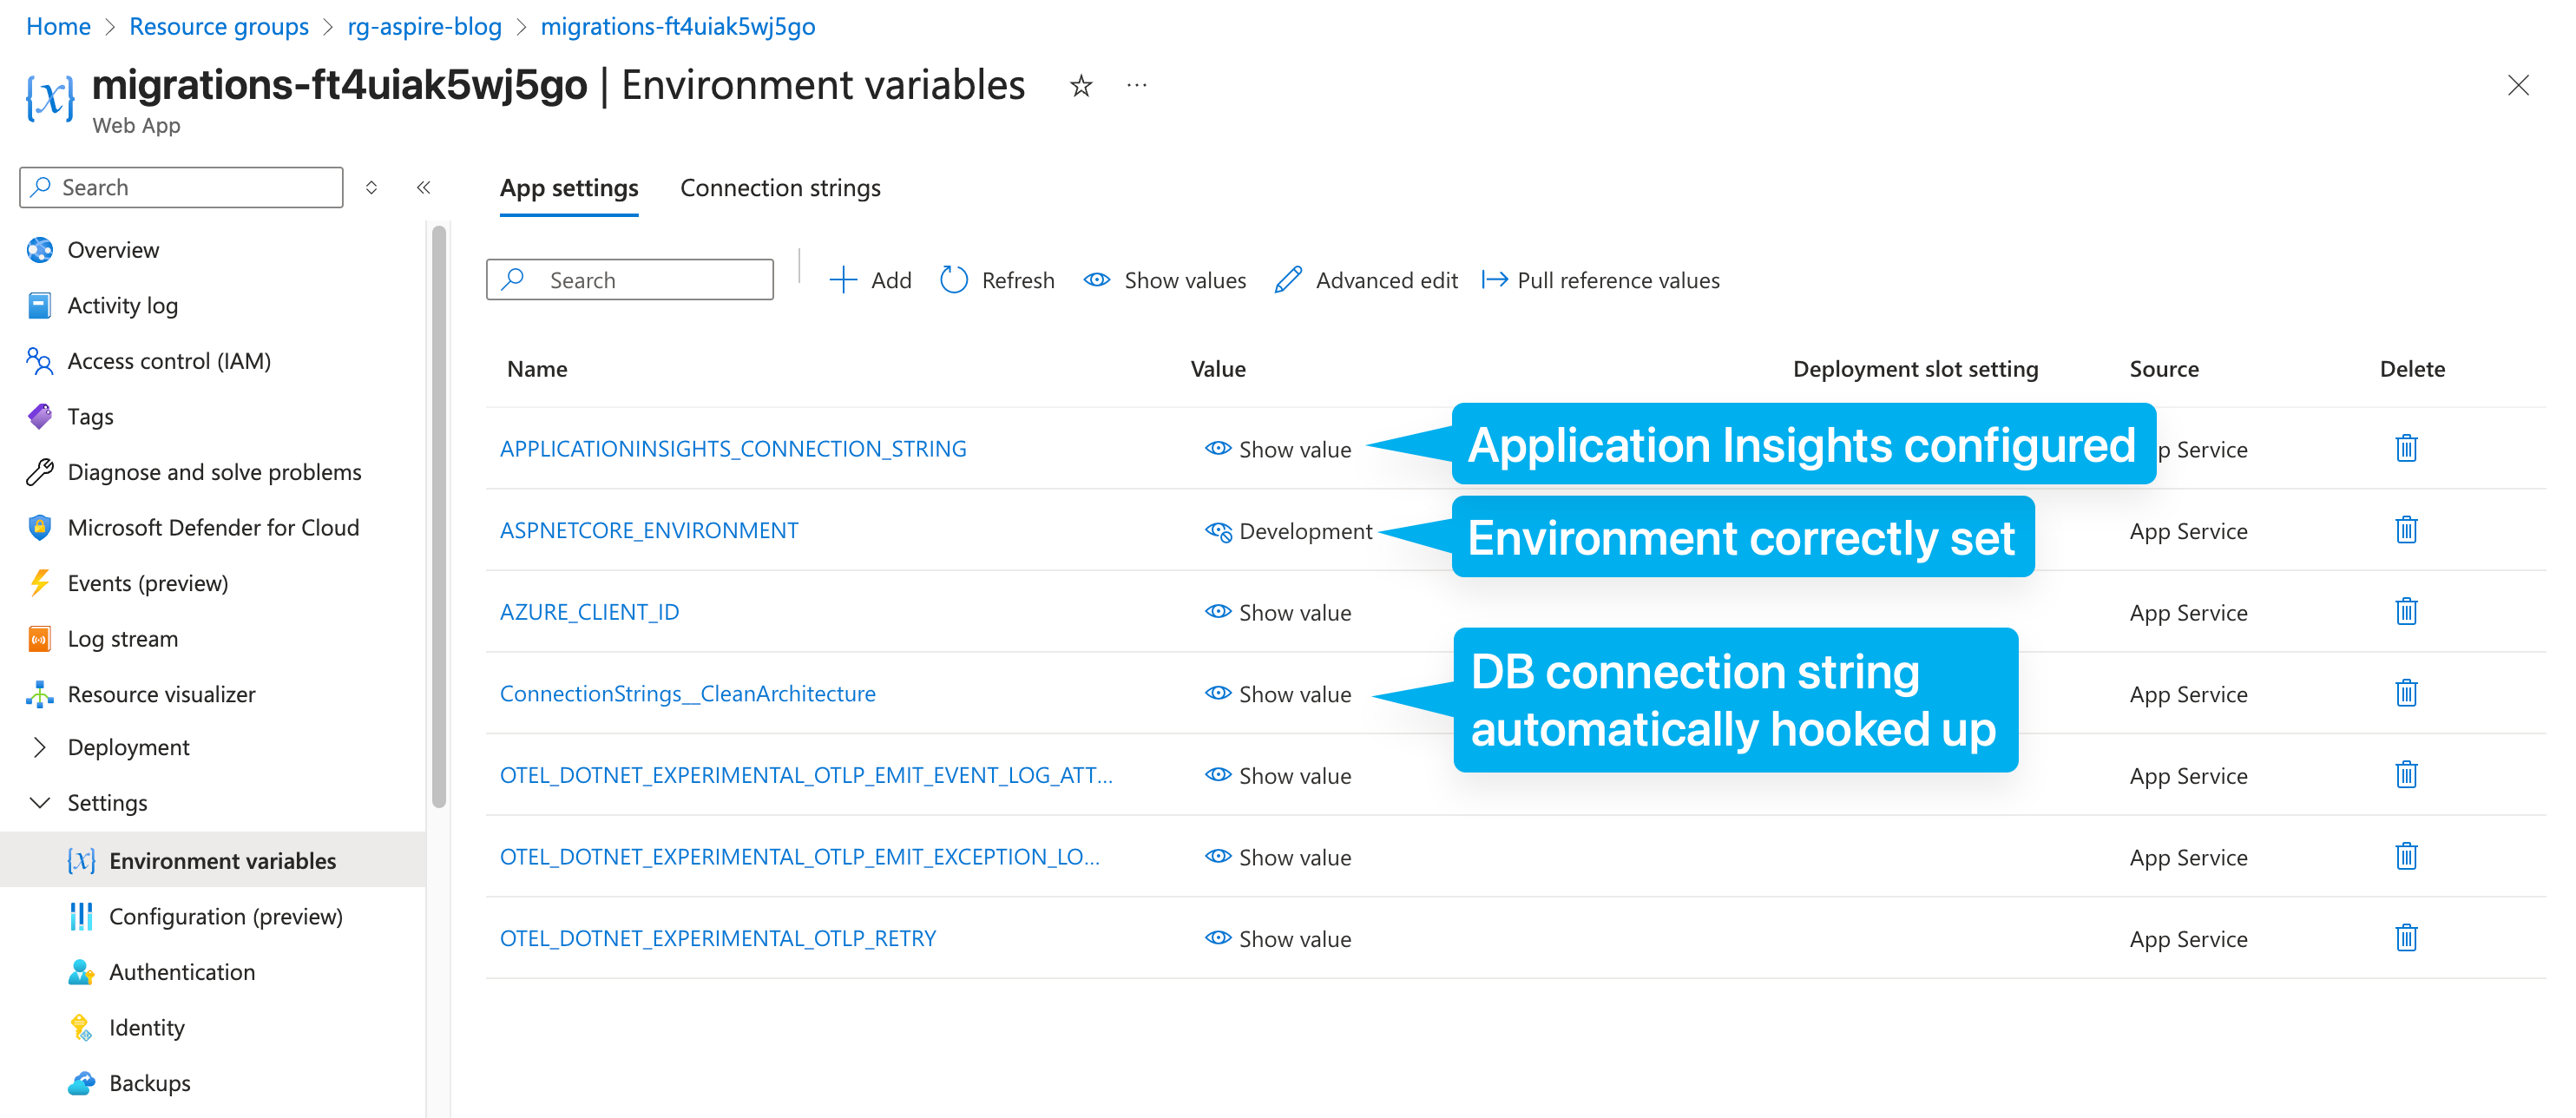
Figure: App Service configuration is as expected
Conclusion
Over this walkthrough the Aspire solution was adapted from a default container-first model to a managed Azure posture: Azure SQL Database instead of a containerized instance, two web workloads (API + migration/seed service) published as Azure App Services on a cost-efficient B1 plan. We also added conditional wiring of Application Insights + Log Analytics only in publish mode, and a repeatable lifecycle driven by the Azure Developer CLI. The result is a predictable, governance-friendly deployment surface that still preserves Aspire's local developer ergonomics and ordered startup (migrations before API) while enabling managed identities, observability and controlled spend.
If you're thinking about where to go from here, consider add a CI/CD pipeline invoking azd provision + azd deploy separately for finer control in the appropriate stages of your deployment process.
I hope you've found this helpful to see how Aspire can be used to customize Azure deployment to fit your needs. If you have any questions or suggestions for future articles, please let me know in the comments below or on social media. 🚀
Sample Code
This code for this article can be found on GitHub